Making the Model
I took a baseline measurement of the outer diameter of the drainage pipe we used for our feeders. This came out to be 3.5 inches.
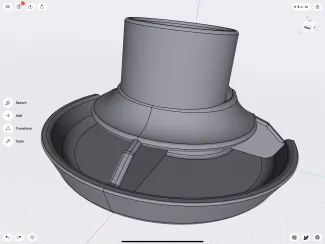
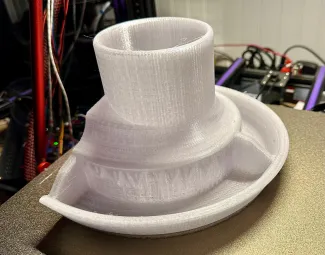
Once I had that, I opened Shapr3D to start a model for a feeder base for our existing gravity feeders. I wanted the base to allow room for multiple birds to eat from a single feeder. The benefit of bowls for feed is that many birds can eat at the same time. The downfall is that the birds usually will either tip the bowl over or stand it in and kick all of the feed onto the ground.
Another consideration I had was allowing birds, such as roosters, with larger combs more clearance when eating.
I decided to model it after some of the more popular feeders on the market, with a wide base and an inverted funnel shape to direct the feed into the base. I added a divider in the middle to strengthen the part and also direct the flow of feed into the base.
I also angled the base downward to encourage the feed to slide forward toward the outer edge.
Printing the Model
I started printing the model on my Frakenprinter (a heavily-modified Eryone Thinker S) since I needed it's 310x310mm base plate.
I also ended up switching to a 0.6mm nozzle and Orcaslicer, since Cura was giving me mixed results with the new nozzle size. It generated a model that was heavy in supports. This was due to me relying on default settings for the supports. In this orientation, it also required the supports to be generated on the model in places. I usually avoid things like this, since I've had mixed results with supports like this. But in the orientation with the base flat on the plate it was the only option.
The print took 17.5 hours (give or take) and actually failed part way through. I think my Raspberry Pi froze and since I'm running Klipper, that made my print job dead in the water.
Removing the Supports
The supports ended being up much more difficult than I'd originally thought. I had to use pliers, a hammer, a chisel, AND fire. It was a nightmare. I couldn't remove the supports that were on the baseplate at all. They just became part of the final print.
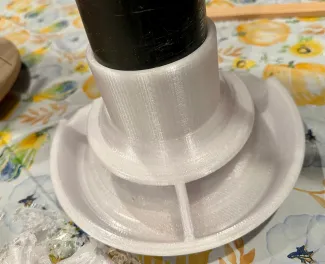
But even with all of that, the print came out better than I'd hoped. The inner diameter of the model was set at 3.5", but the tolerance wasn't permissive enough. It was too small for the pipe to fit. We ended up grinding down the pipe to make it fit and it does now. The next version of the model will be printed slightly larger to ensure it has a better chance of fitting the drain pipe.
Testing the Results
After we fitted the base of the feeder to the pipe, we attempted to fill it with feed. And we noticed a LOT of it was bouncing out onto the table. This was actually not unexpected since it was what happened with the original feeders as well. The feed was moving too quickly when it reached the bottom of the pipe and it didn't have anthing to slow it down.
So I "primed" the feeder by putting feed in the tray all the way up to the brim. Then I filled the pipe. That time, it worked as expected!
And when I scooped feed out of the tray, more came down to take its place. Also as expected! So it worked!
The Next Iteration
I've already mentioned that I am planning on scaling the model up slightly to make it more likely that the drainage pipe will fit without alteration.
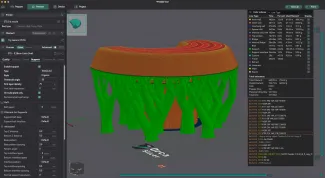
Additionally, I've altered the print orientation so the only supported created are attached to the baseplate. This should make it easier to clean up the print in the end.
The print itself is much different-looking than the last. But I'm hopeful it'll be better in the end.
Between the failed prints and the previous, successful print, I've burned through over half a roll of Overture Transparent PETG. So, tomorrow morning when I check on the print, I'll also need to check that more filament isn't needed.